
MaptiveIQ - Working With Your Data
In this tutorial, you'll learn how to work with your data to get the most out of Maptive.
Specifically, we will cover:
- How To Import Your Data
- How To Modify Your Data From the Data Tab
- How To Edit Your Data Directly From the Map
- How To Add a New Row of Data
- How To Delete Rows of Your Data
- How To Add an Image to a Map Marker
- How To Export Your Data
- How To Match Up Your Data
How To Import Your Data
For videos click the following link for your use case.
Create A New Map Using Google Sheets
When importing your data into Maptive, you have a few options.
Note: Your data needs to include header columns (such as Address, City, Zip code, Name, Phone Number, etc.) that tell Maptive what the data is.
Here are the steps:
Step 1: Sign in to your Maptive account. After logging in, you will be brought to the homepage dashboard. All maps created earlier are listed here.
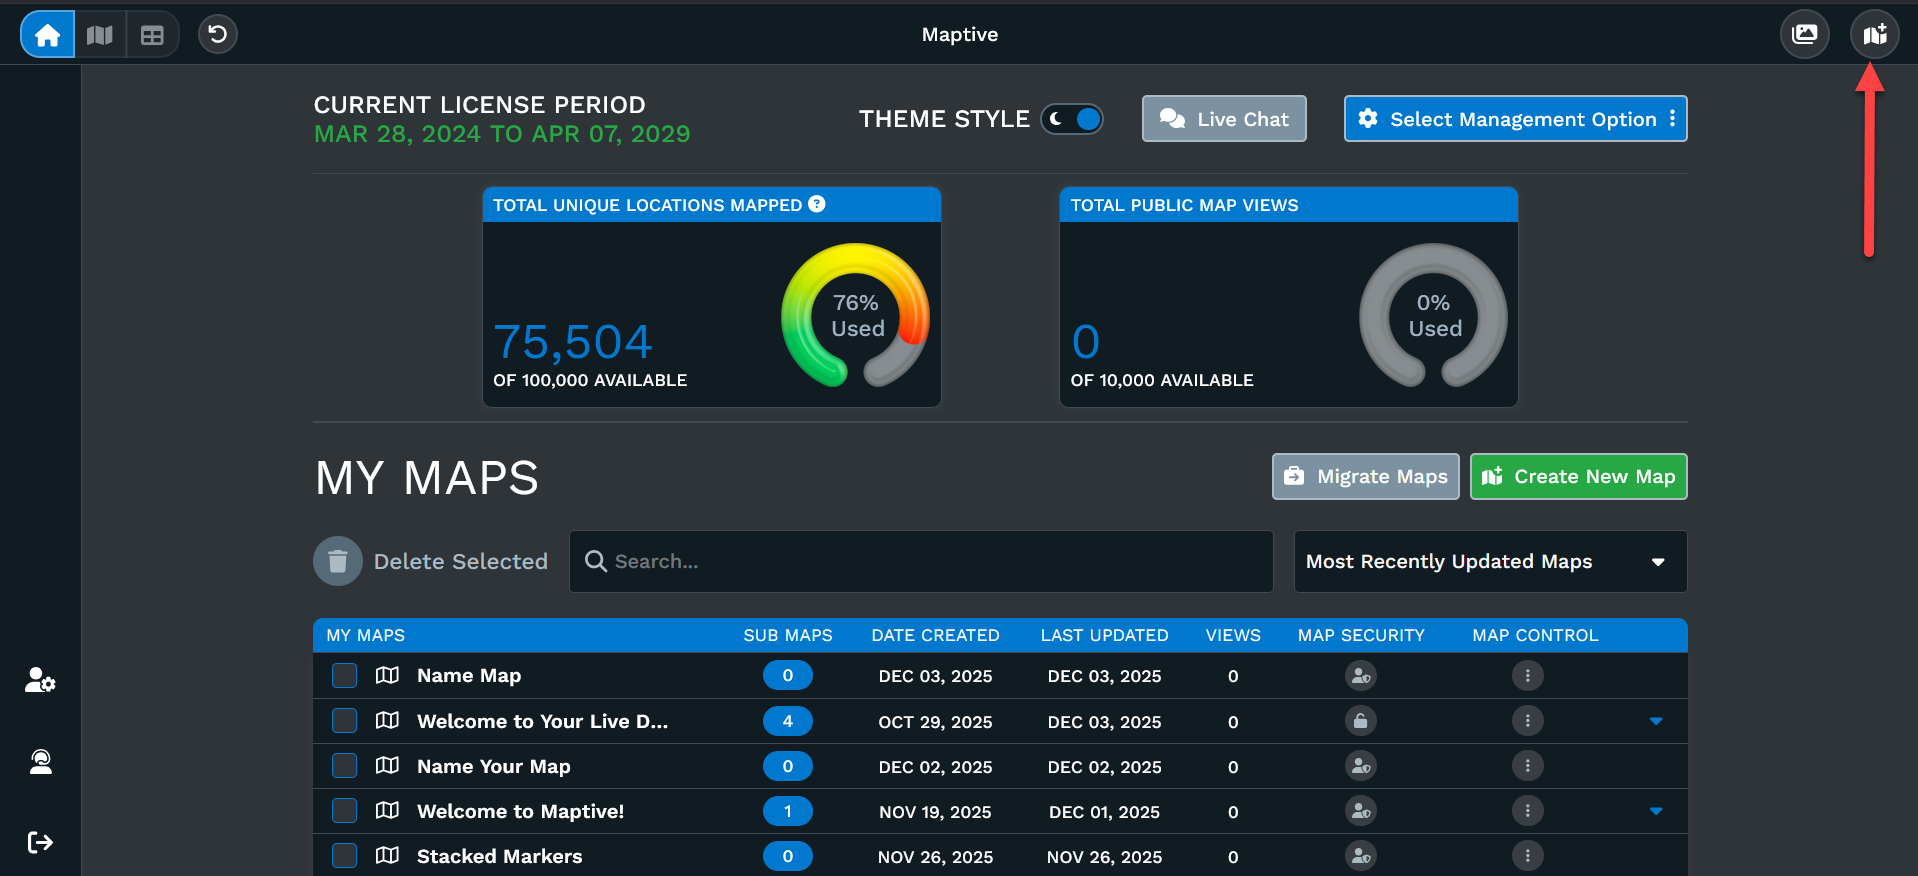
Step 2: Click 'Create New Map' on the upper right-hand side to get started.
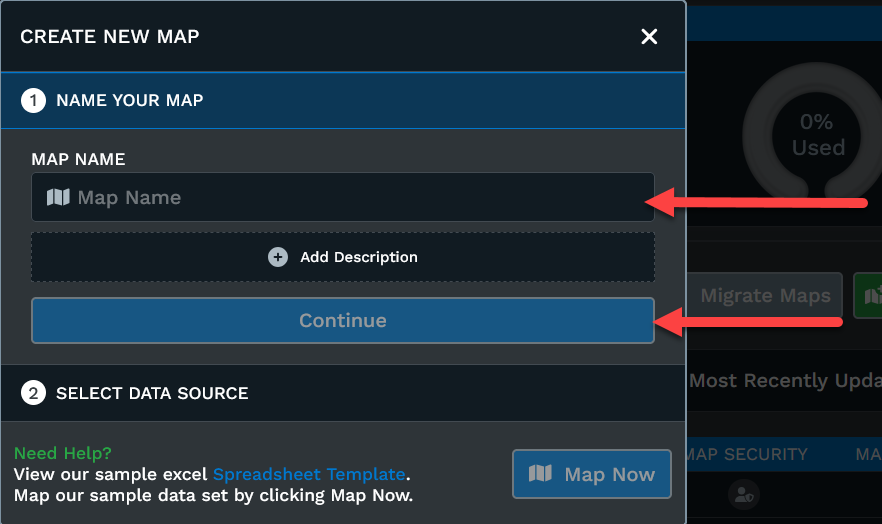
Step 3: A pop-up window will appear where you can name your new map and write a brief description (optional). Click the 'Continue' button when ready.
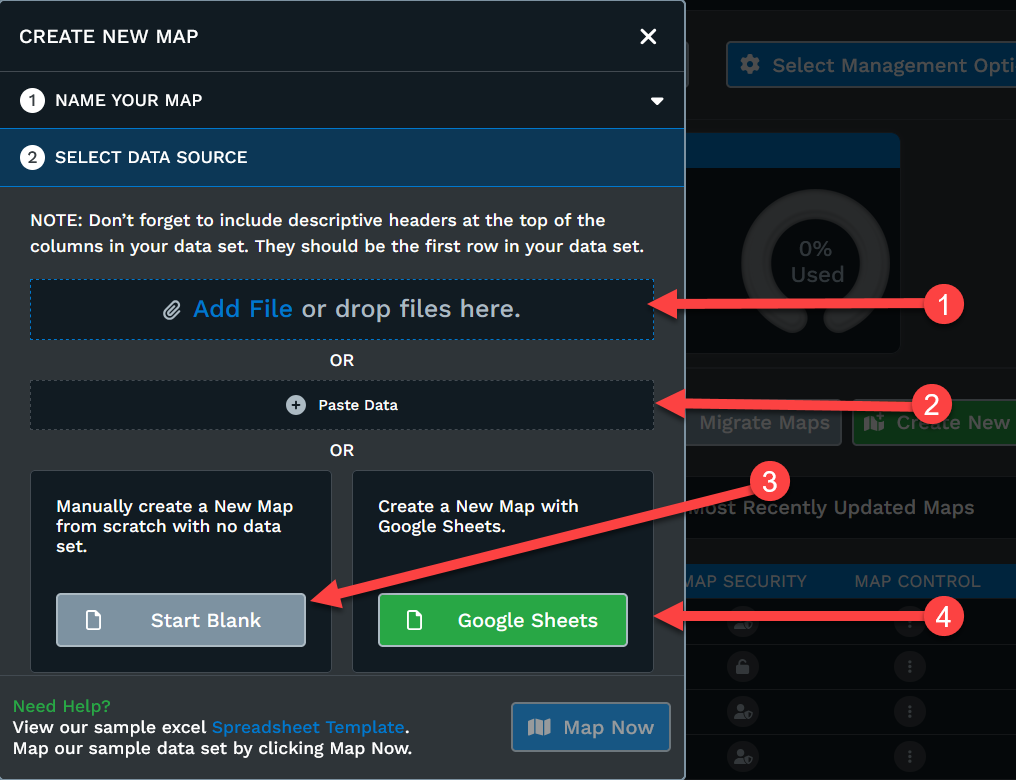
Step 4: Upload your data into Maptive. To do so, you have a few options:
- You can select your excel file here or drag and drop your file.
- You can copy/paste your data (including column headers) into the program.
- You can start with a blank map and manually add each of your locations on the map.
- You can create your map using your Google sheet.
Note that your data needs to include header columns (such as Address, City, Zip code, Name, Phone Number, etc.) that tell Maptive what the data is.
After you've uploaded your data, click the 'Map Now' button.
How To Modify Your Data From the Data Tab
You can modify map marker data directly in your map and also modify your map data from the Data Tab in your Maptive account. Follow the steps below:
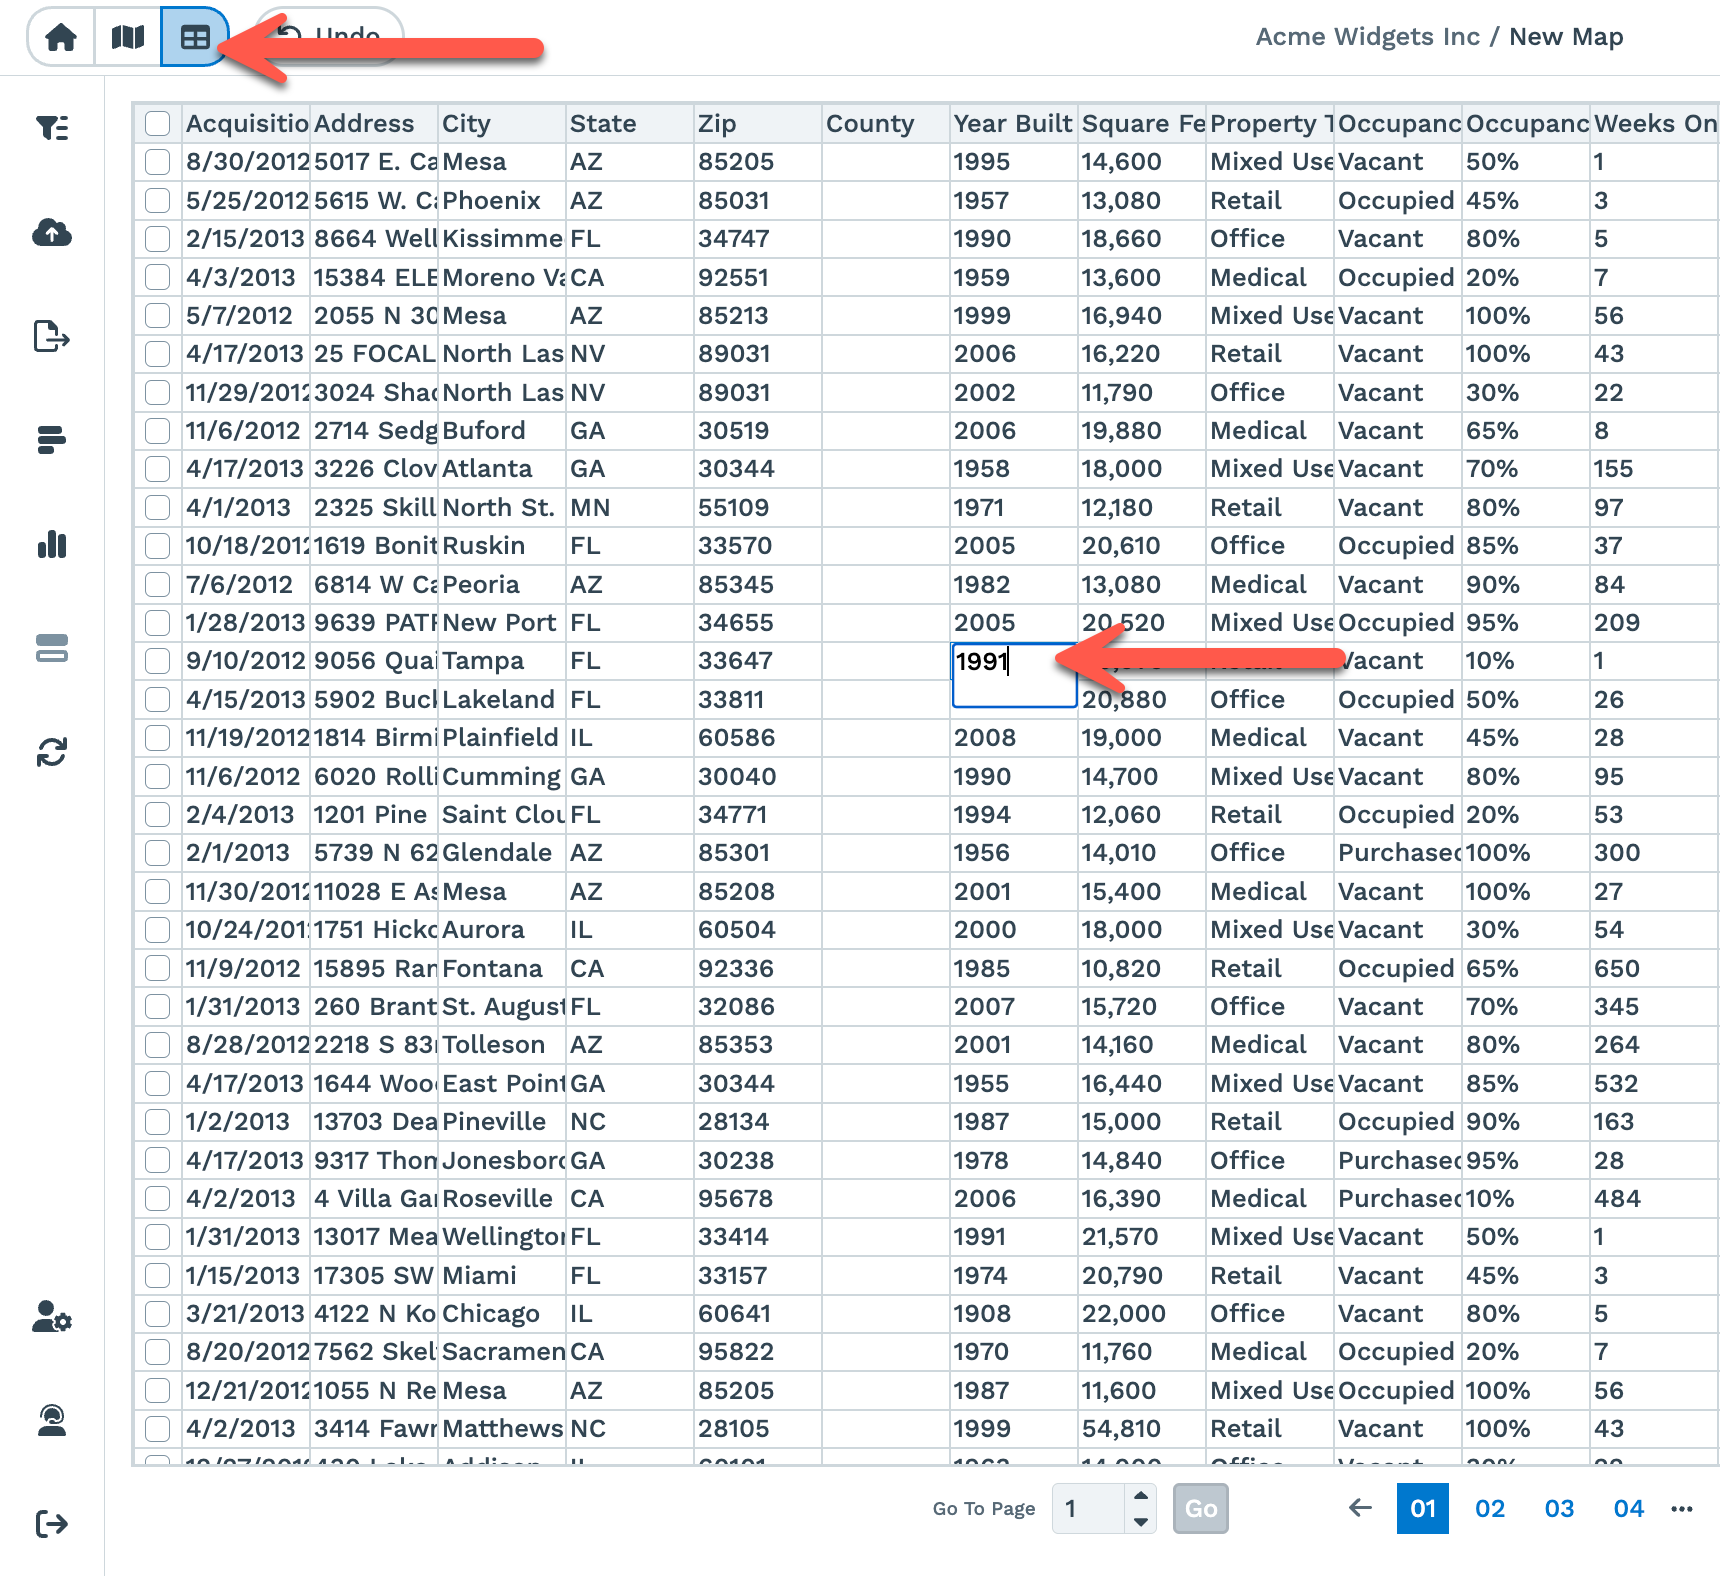
Step 1: Click on the 'Data' tab to open your imported data set.
Step 2: You can edit your data directly in the cells.
Step 3: After you make a change, press the Enter key to save your changes.
How To Edit Your Data Directly From the Map
To edit data directly from a map, follow the steps below:
Step 1: Click on a map marker location in your map view. This will open the map marker information panel on the right-hand side of the map.
Step 2: Click the 'Settings & Customization' icon for that map marker location.
Step 3: Select 'Edit Data' from the drop-down list.
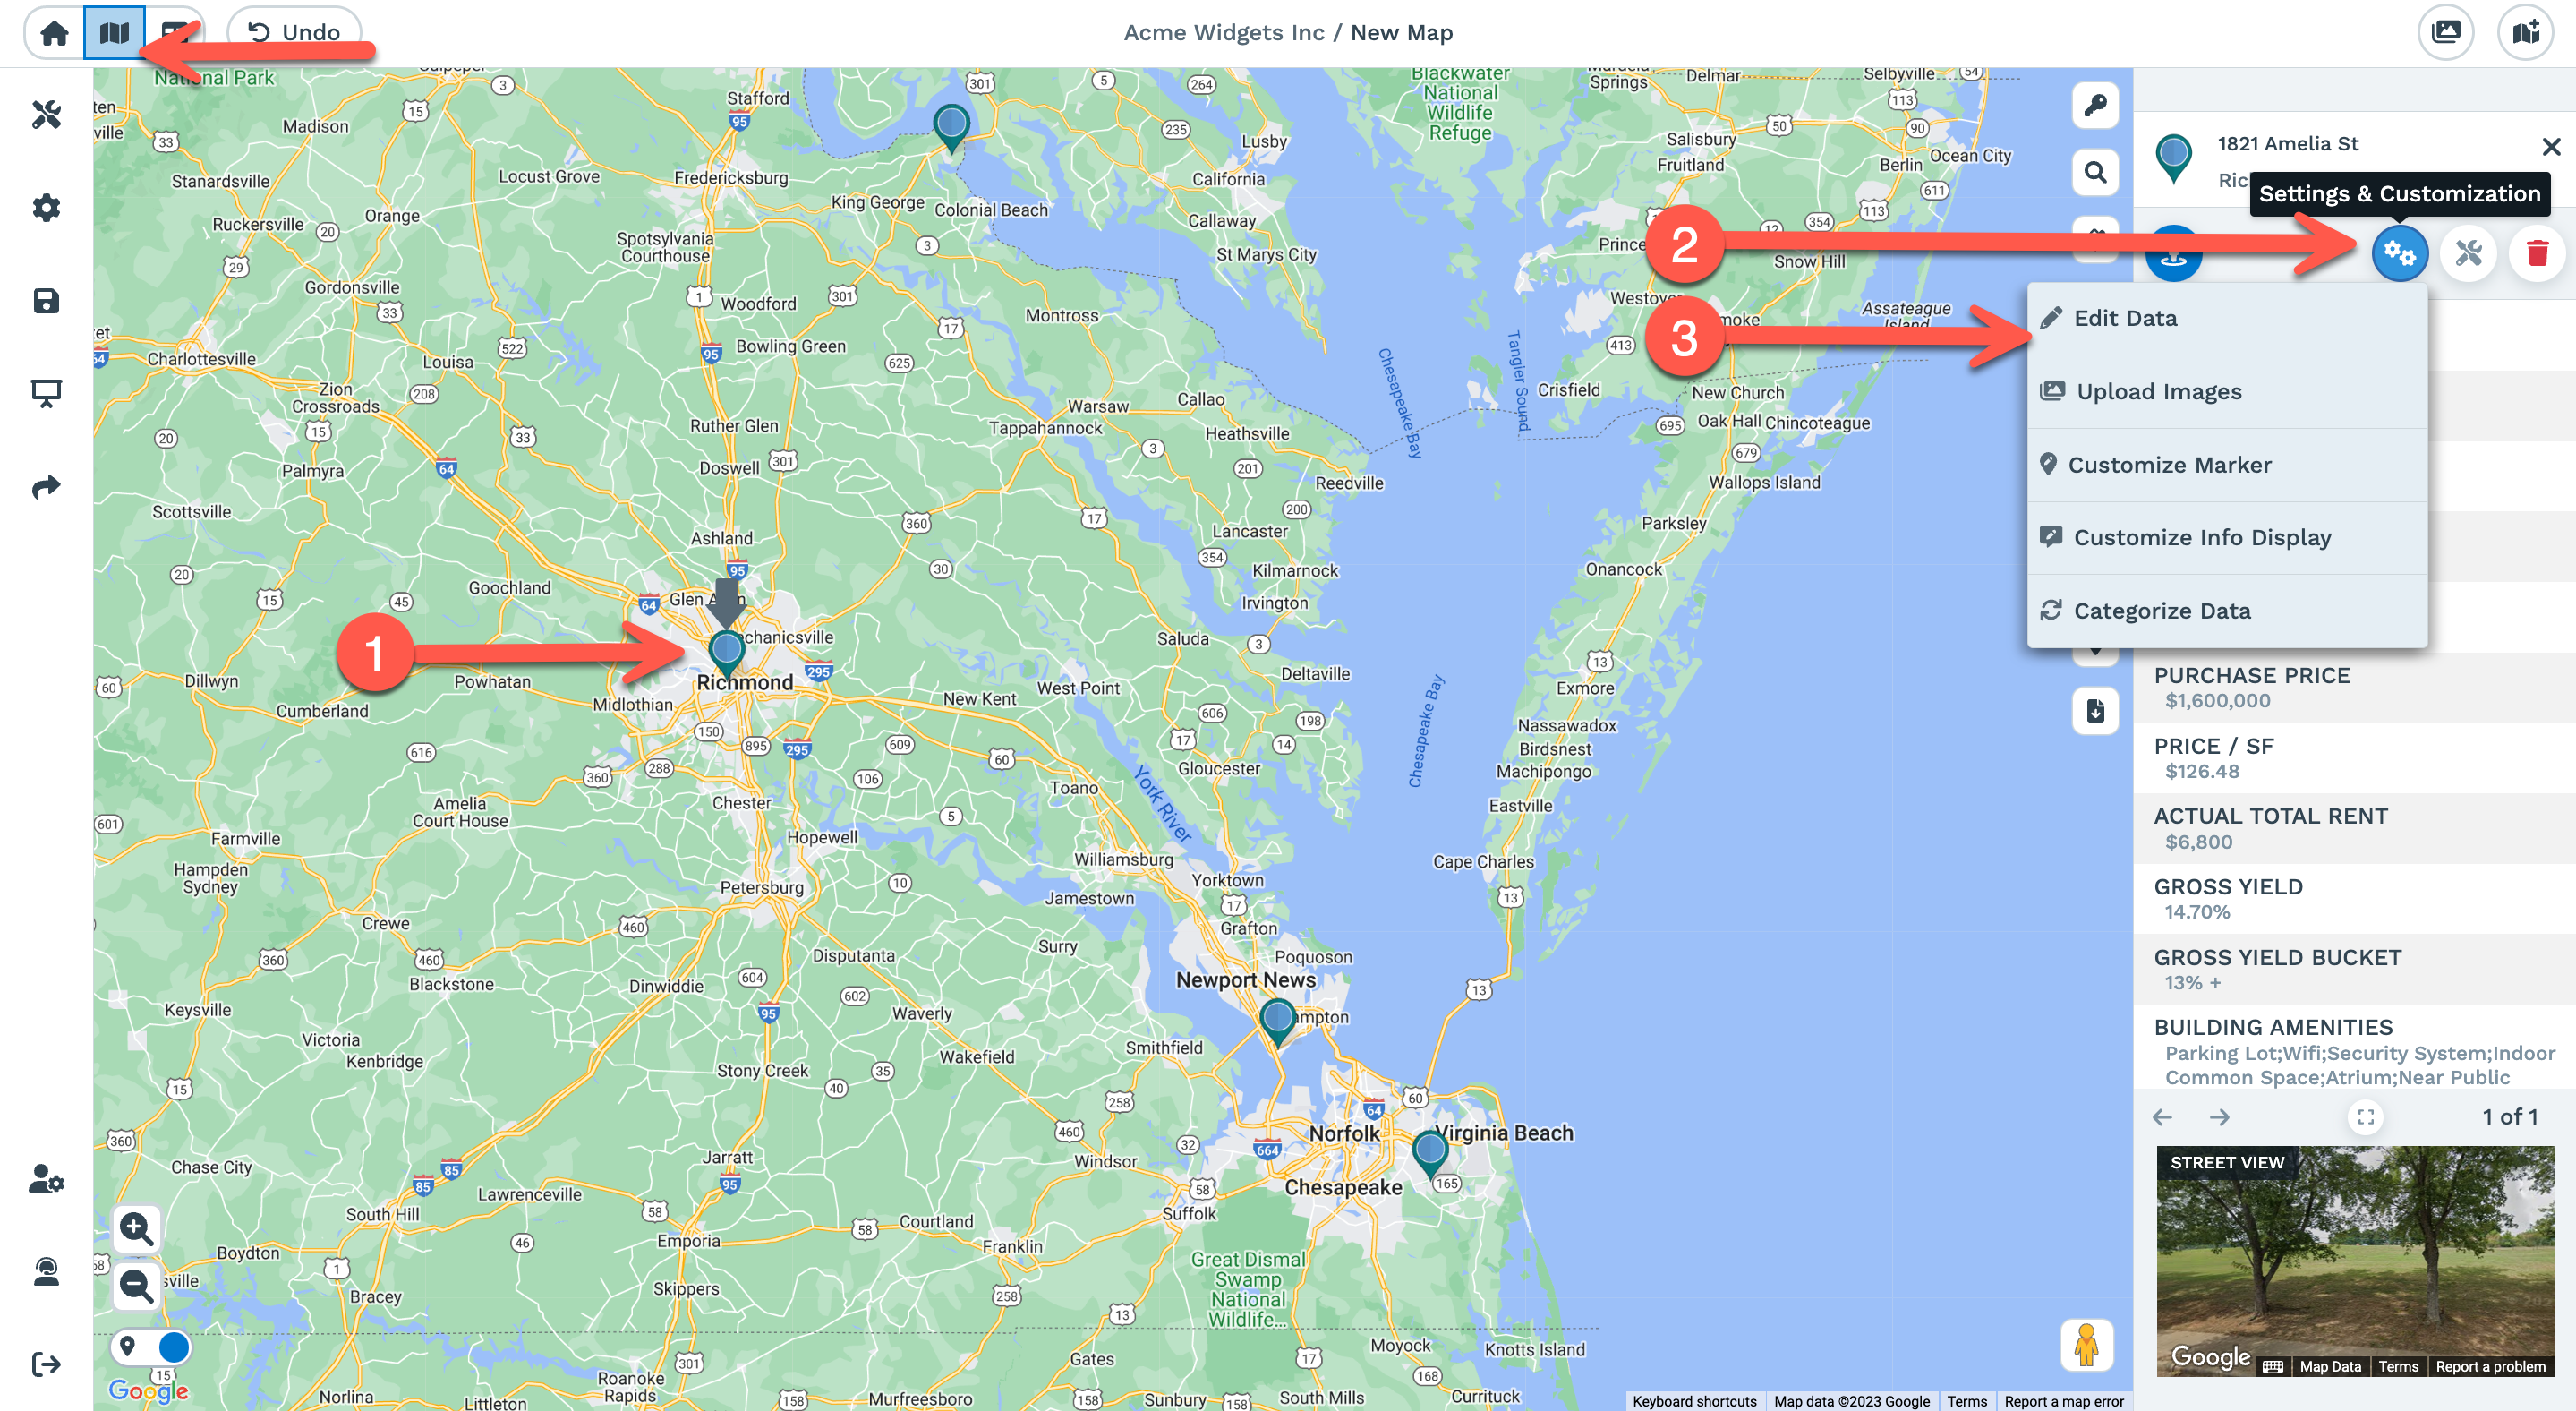
The following window will open when you click on Edit Data:
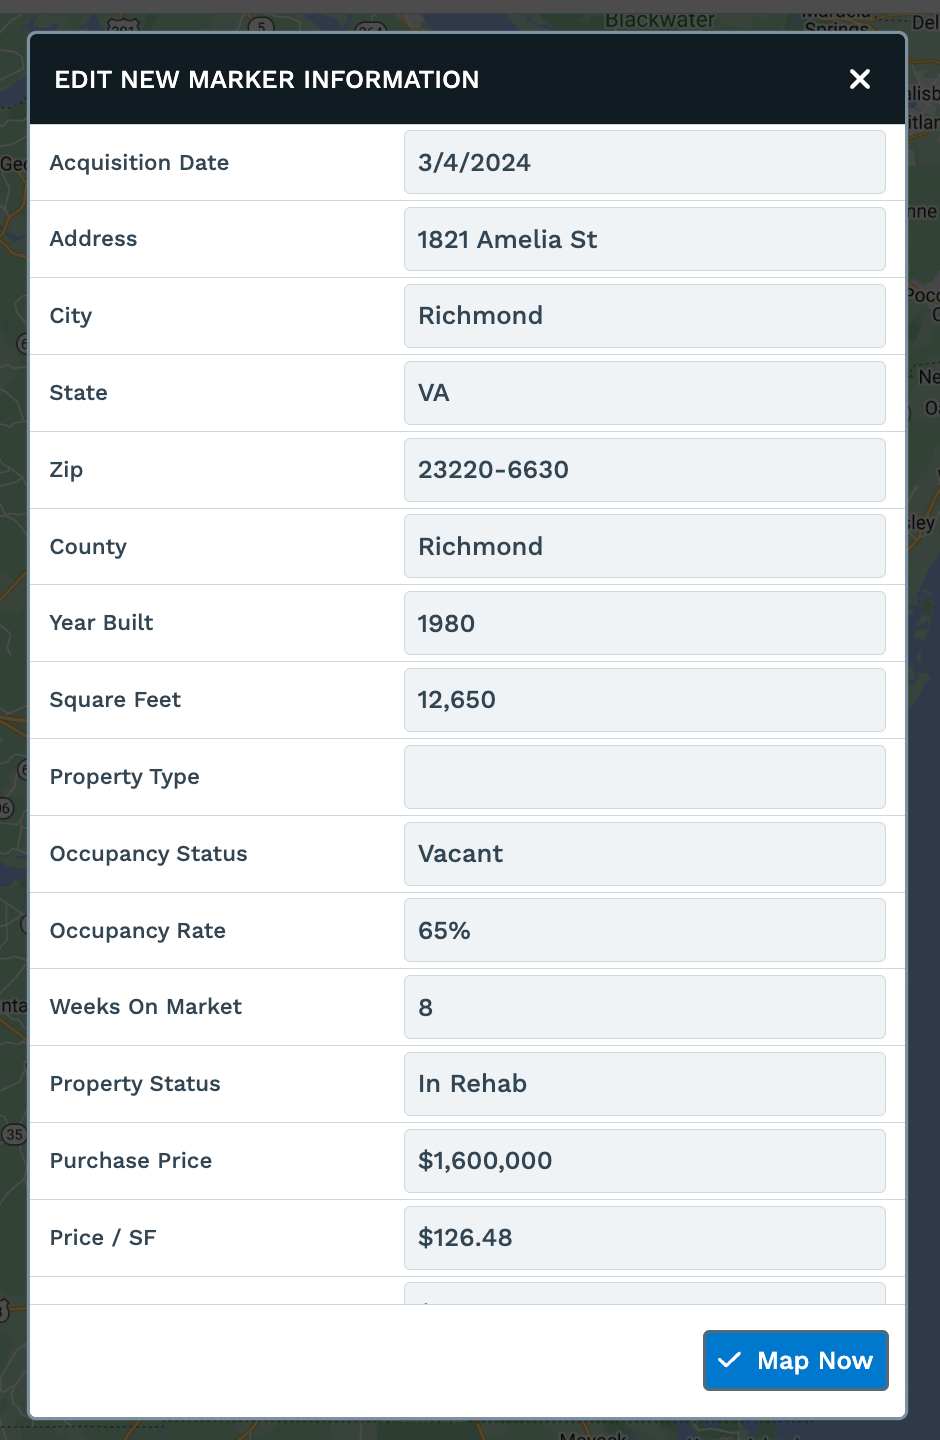
Step 4: Make necessary changes to your data, then click the 'Map Now' button to save your changes.
How To Add a New Row of Data
Step 1: To add a new row of data, first click on the 'Data' tab in your Maptive account.
Step 2: Select the "Add New Row" option from the left-hand side menu.
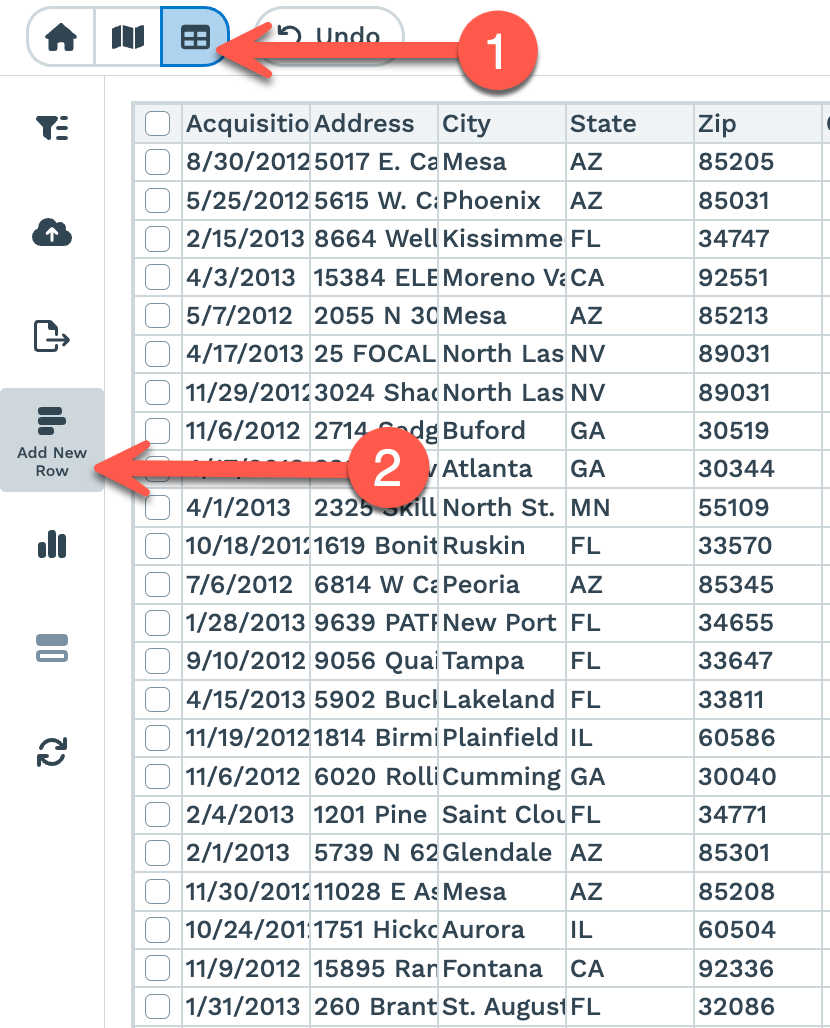
Step 3: The following window will appear where you can enter information for your new location:
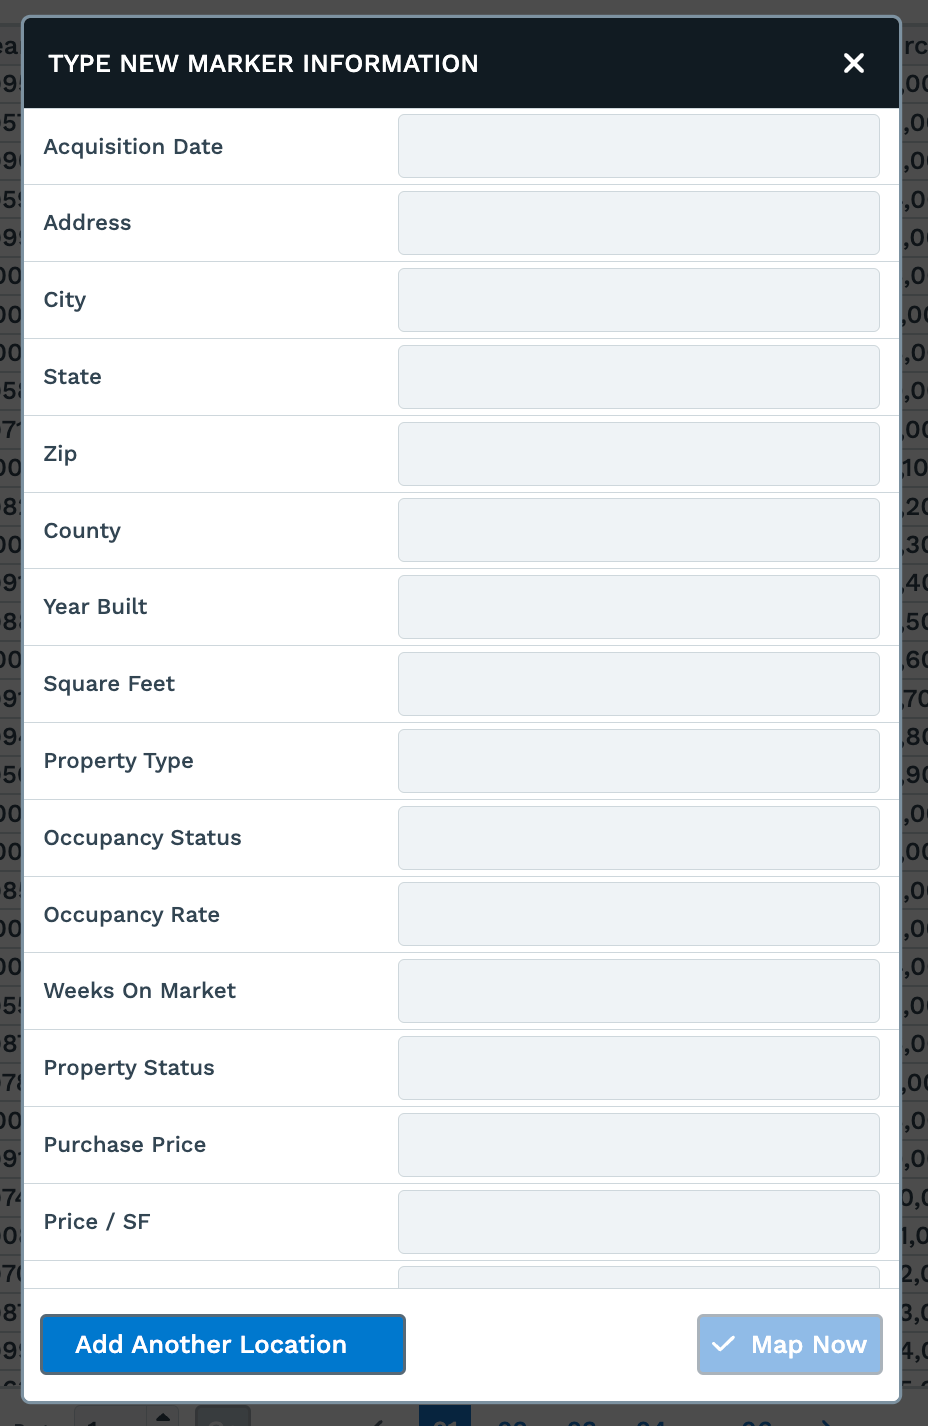
Step 4: To save and add your new row to the dataset, click 'Map Now.'
Optional Step 5: To add more rows to your dataset at that time, click on 'Add Another Location.' The previous data you entered for your new row will be automatically saved.
How To Delete Rows of Your Data
Step 1: Click on the 'Data' tab in your Maptive account.
Step 2: Click the check box for the row of data you wish to delete.
You can select multiple rows at a time.
Step 2: Select the "Delete Rows" option from the left-hand side menu.
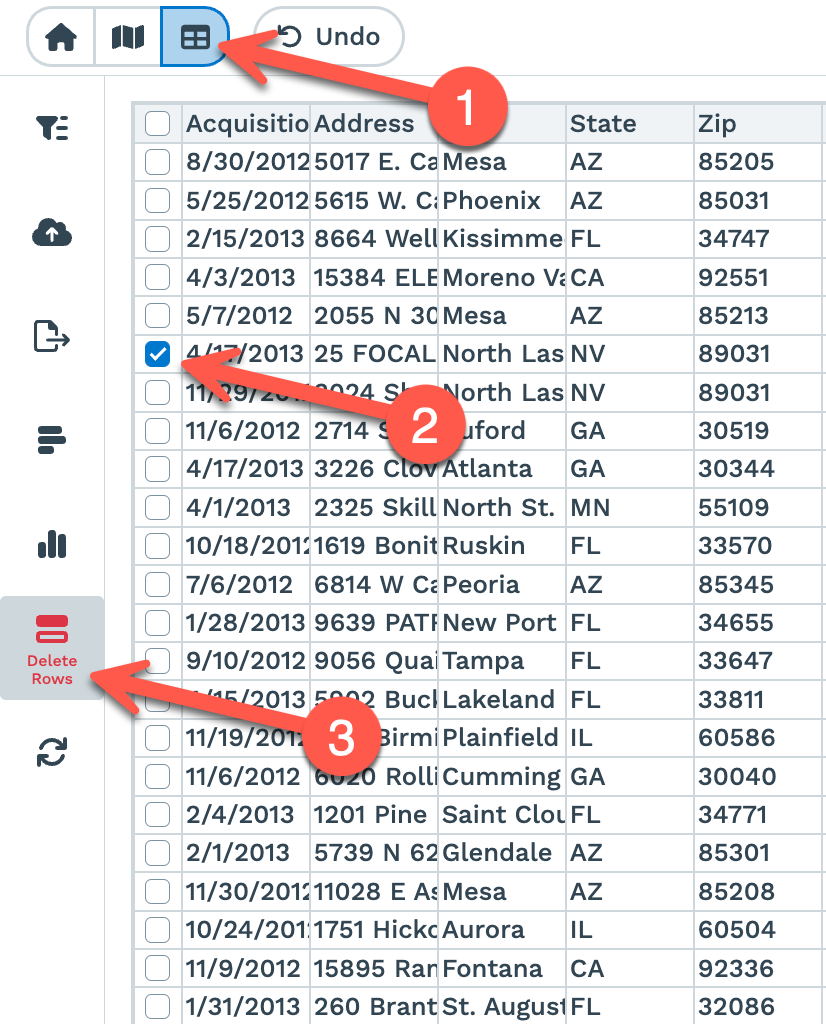
Please keep in mind that deleting is permanent.
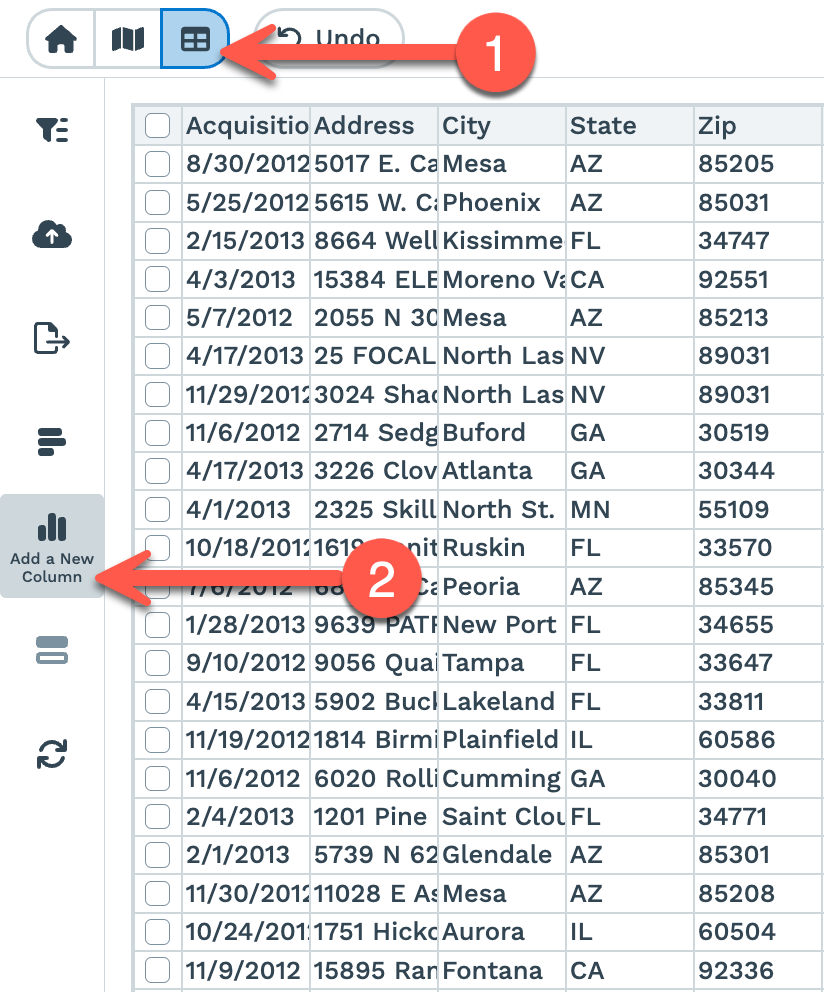
How To Add a New Column to Your Data
Step 1: Click on the 'Data' tab in your Maptive account.
Step 2: Select the "Add a New Column" option on the left-hand side menu.
Step 3: The following window will appear where you can enter information for your new column.
You'll need to Name your Column, but the Default Value can be filled in or left blank.
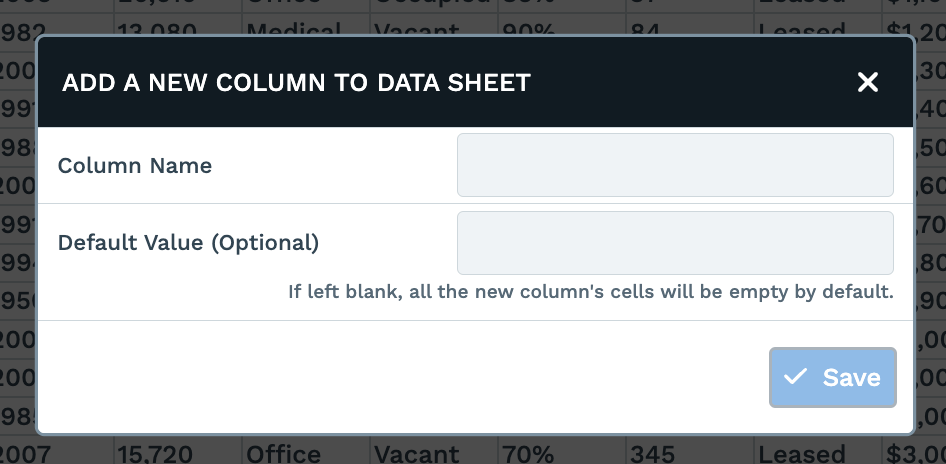
Step 4: Click 'Save,' and your new column will be added to the end.
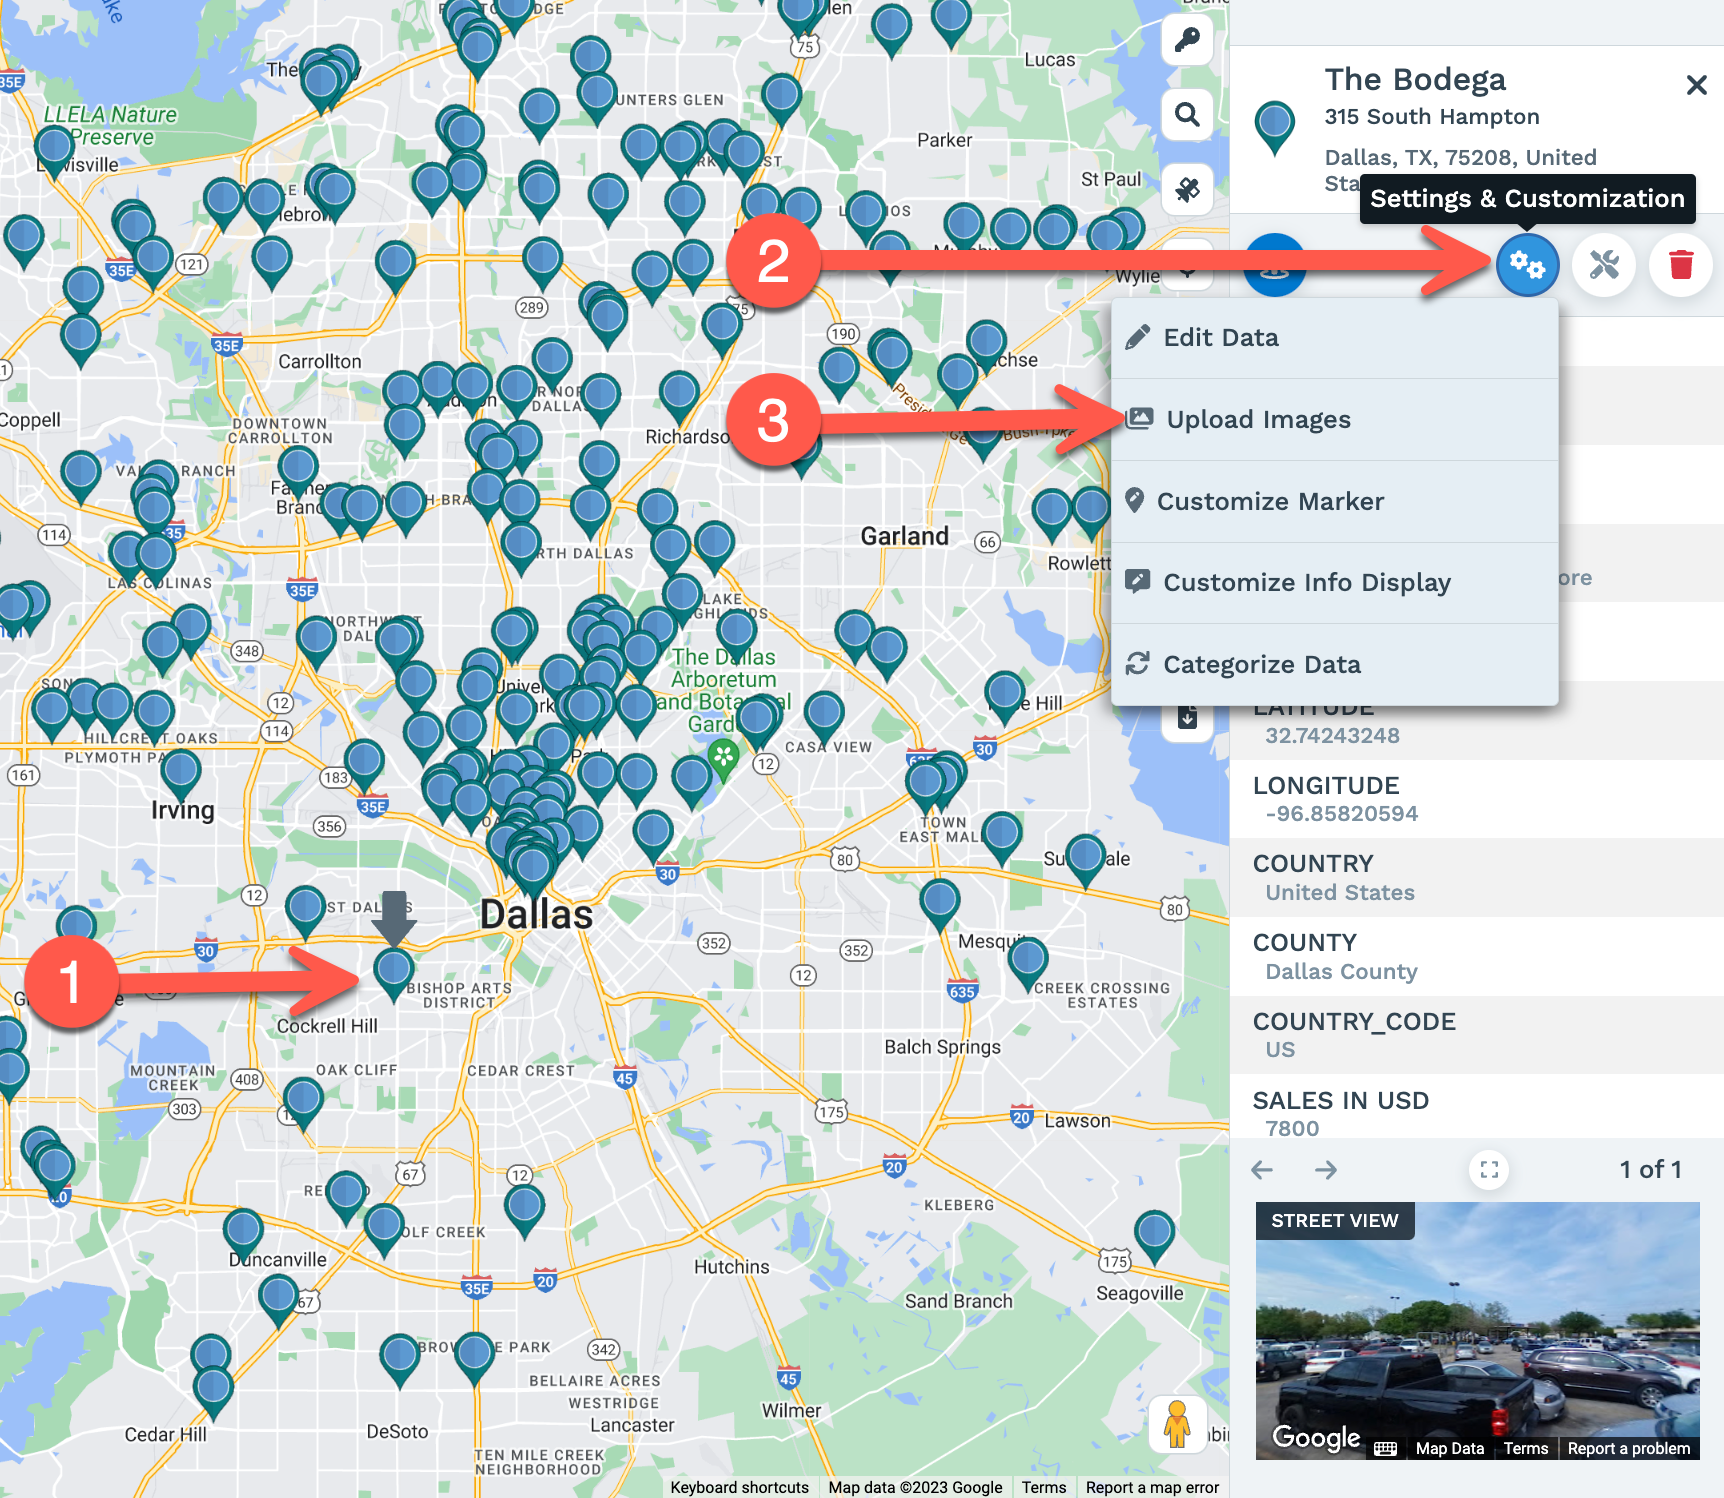
How To Add an Image to a Map Marker Popup
To add location images to your map marker, follow the steps below:
Step 1: Select and click on the marker you want to add location images. The map marker information panel will appear on the right-hand side of the map.
Step 2: Click on the 'Settings & Customization' icon to open a drop-down menu.
Step 3: Select 'Upload Images.'
Step 4: A pop-up window will appear where you can either upload images or drag & drop images.
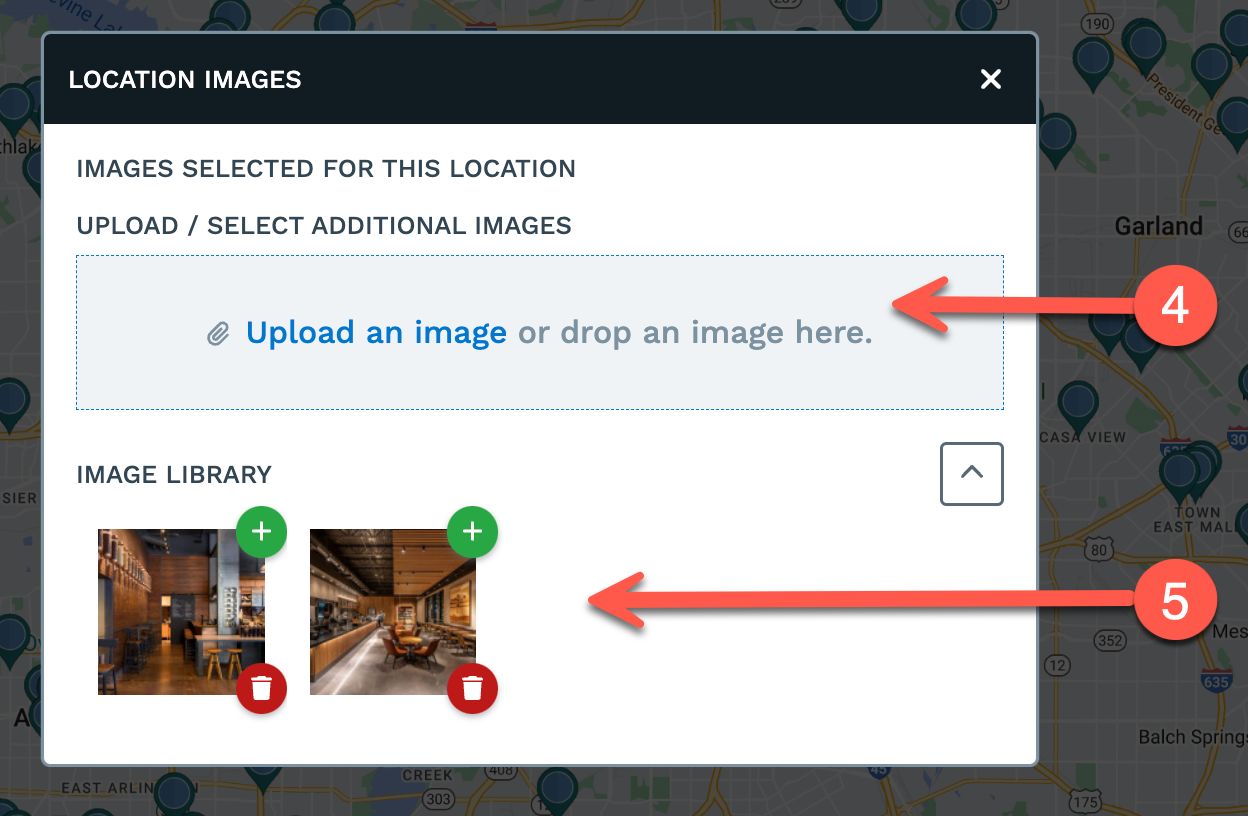
Step 5: All the images you upload for that marker will be displayed in the image library.
How To Export Your Data
Exporting your Map data onto a separate file is easy! Just follow the steps below:
Option 1:
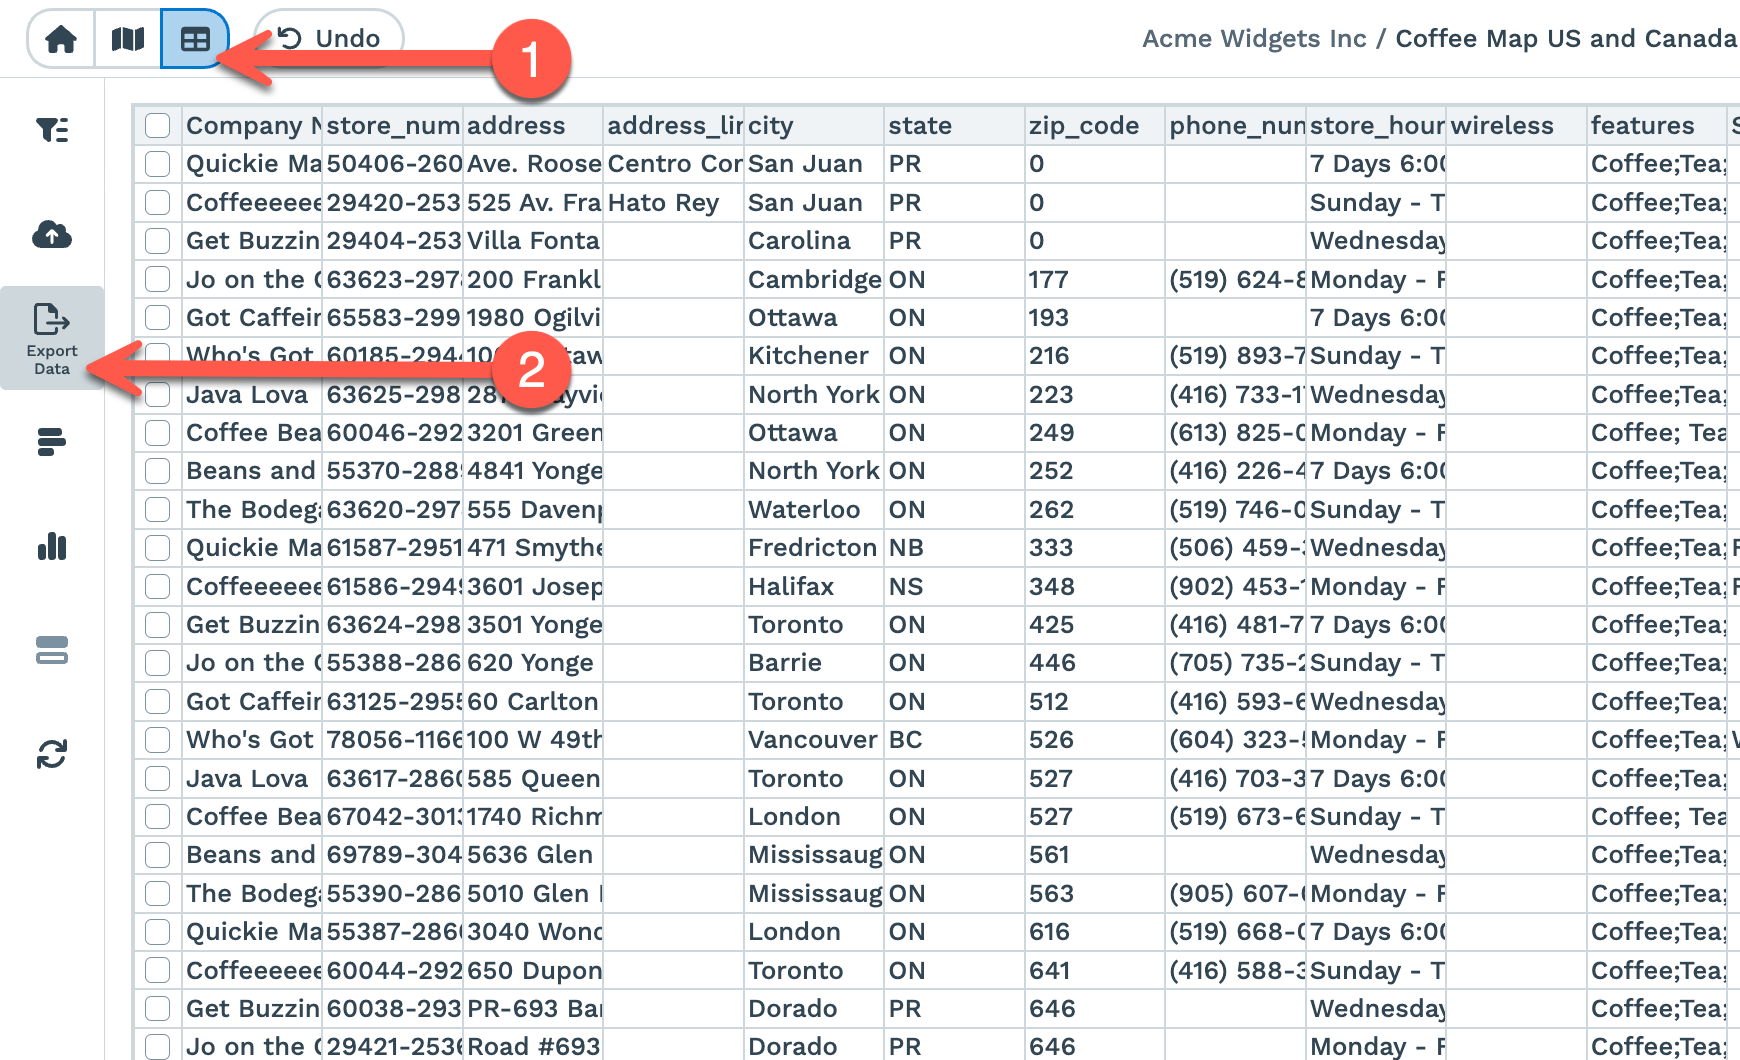
Step 1: To export your data, click the Data Tab in your Maptive account.
Step 2: Select the "Export Data" icon on the left-hand side:
The following window will appear when you click to export your data:
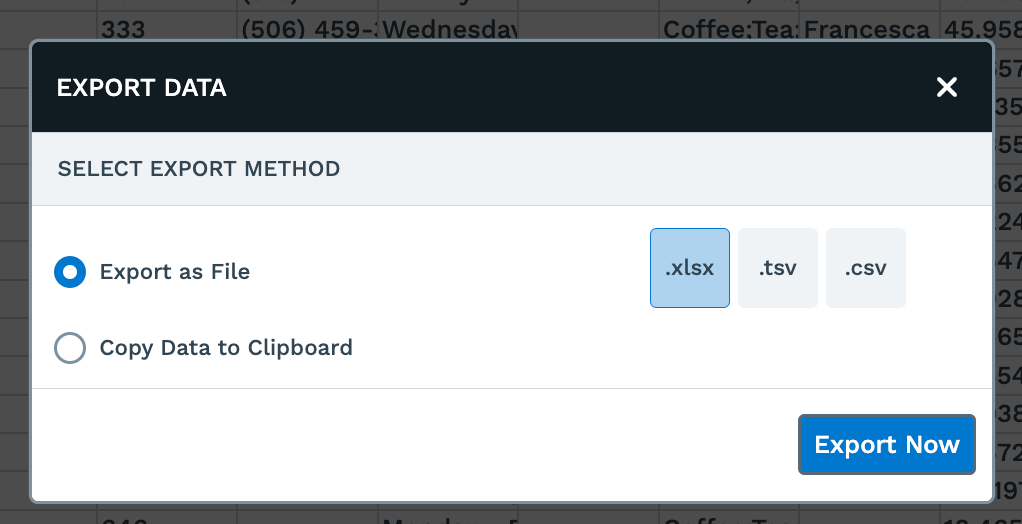
Step 3: You can export the Data as a .xlsx, .tsc, or .csv File or copy the data to Clipboard.
Step 4: Click the Export Now button when you're ready. Your map data will automatically download to your desktop.
Option 2:
Alternatively, you can also follow the steps below to export your Map data:
Step 1: Click on the Export Data icon on the right-hand side of your Map.

Step 2: A dialogue box will appear, and you can decide how to export your map data.

A. You can choose the type of Data you need to Export:
- Export Entire Dataset - To export All your Map Data.
- Export Filtered Data - To export the Map Data created using the Filter tool.
- Export Data Visible on Map - To only export the Map Data currently visible on the screen.
B. You can export the Data as a .xlsx, .tsc, or .csv File or copy the data to Clipboard.
Step 3: Click the Export Now button when you're ready. Your map data will automatically download to your desktop.
How To Match Up Your Data
When you go through the steps to create your map with Maptive, you will be asked to verify that our software has matched the relevant location data columns in your data set to the correct location category. This step is required for your data to map correctly on the map.
Your dataset MUST include header columns (such as Address, City, Zip code, Name, Phone Number, etc.) that tell Maptive what the data is in each of the Map columns. Our program will attempt to match your data columns with the correct categories automatically.
Not every single column you include will be matched. It doesn't need to be. All your data will still show in the marker pop-out on the map, even those not matched.
You can also manually make selections to Match your Location Data or Customize the Info Popup on your Map. Just follow the steps below:
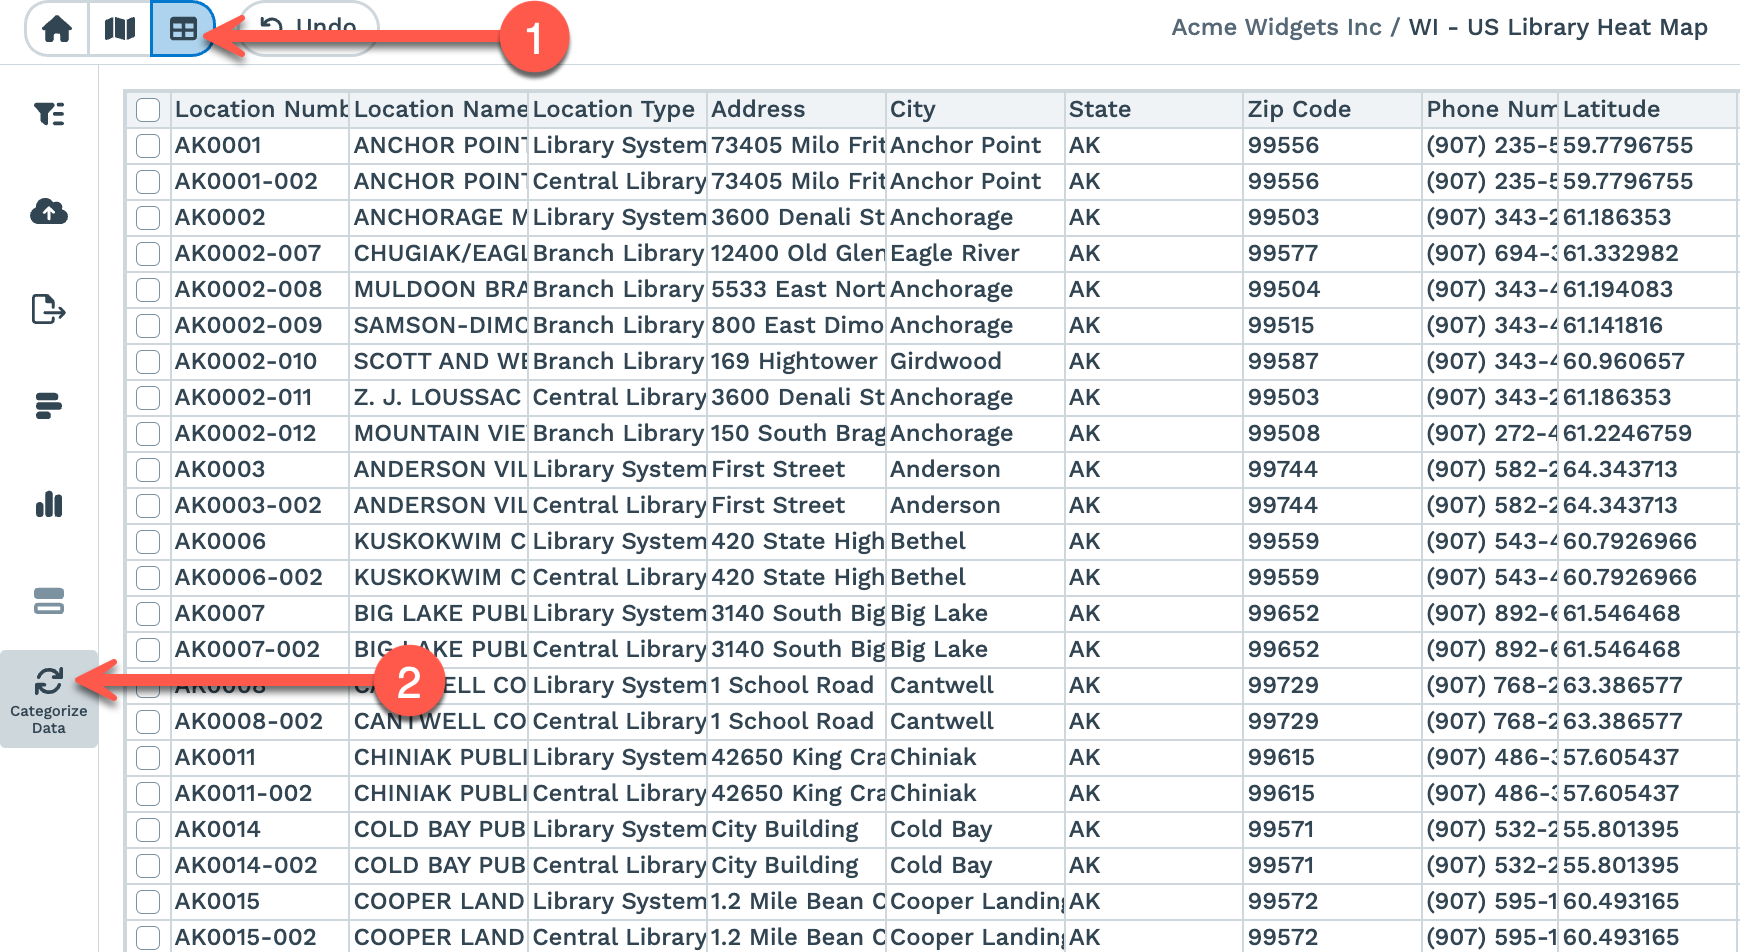
Step 1: Click on the Data tab in the upper left-hand corner.
Step 2: Click the 'Categorize Data' icon on the left-hand side panel.
Step 3: A popup window will appear to match your data manually.
Step 4: To match your data, simply click on the empty/un-matched menu and view the options listed in the drop-down view:
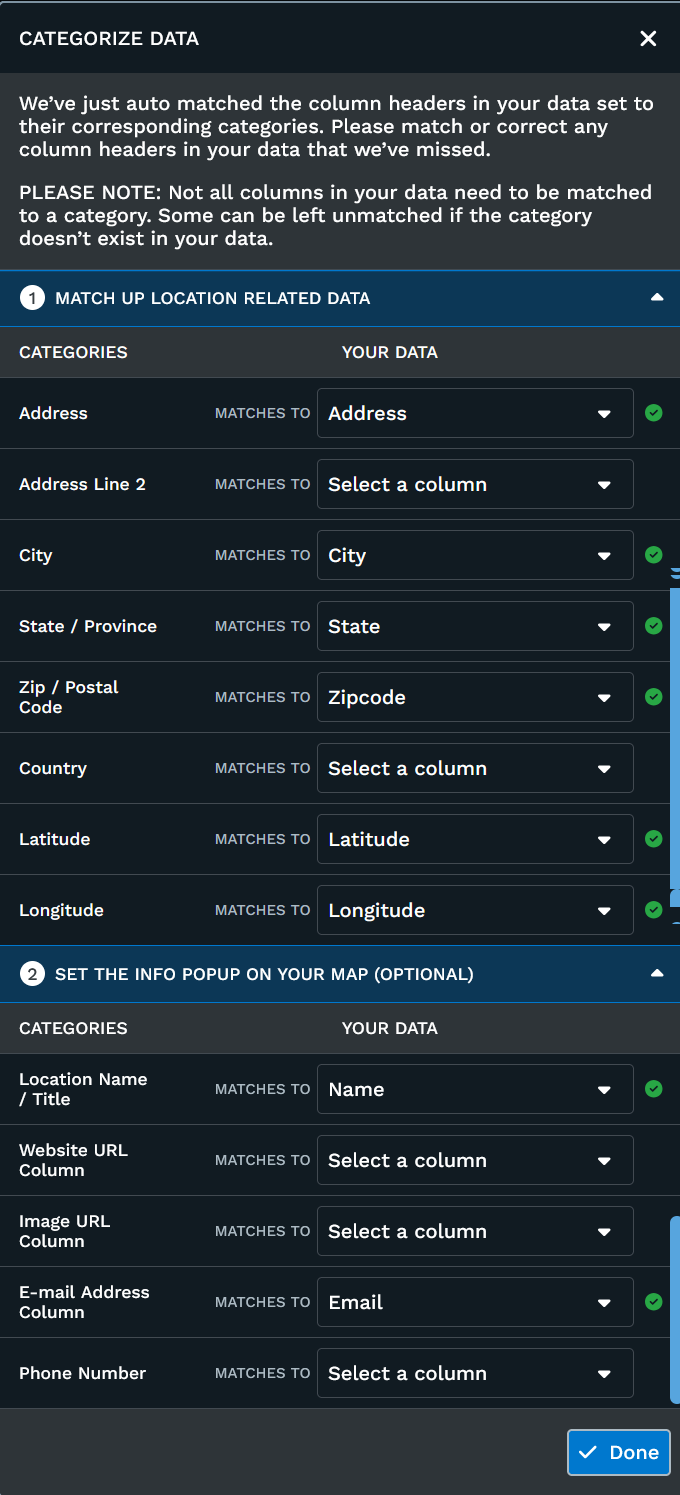
The 'green check mark' on the right side of each represents that the data category has been matched.
Make a selection appropriate for your Map data. If nothing matches the category, you can either select "No Match" or leave the data menu as it is (without any selection). You don't need to make any changes at all if you see all your address columns that you have matched to the appropriate matches in section 1.
Section 1 in the above picture will only be matched to address information. Each address column you have should only be matched to one option once.
Section 2 will automatically match to a phone number, email or website columns. Each can only be matched to one column.