
MaptiveIQ - Customizing Your Shared, Embedded, and Presentation Maps
The Shared Maps/Presentational Maps section within Map Settings allows you to choose which tools your non-licensed users can see/use and which they can not. You can do this with a simple switch. There are also options to activate a feature automatically if you wanted to have the map make it clear that a user might want to use a tool like the location finder. Follow this guide to learn about the features you can turn on and off on a shared, embedded, or presentation map.
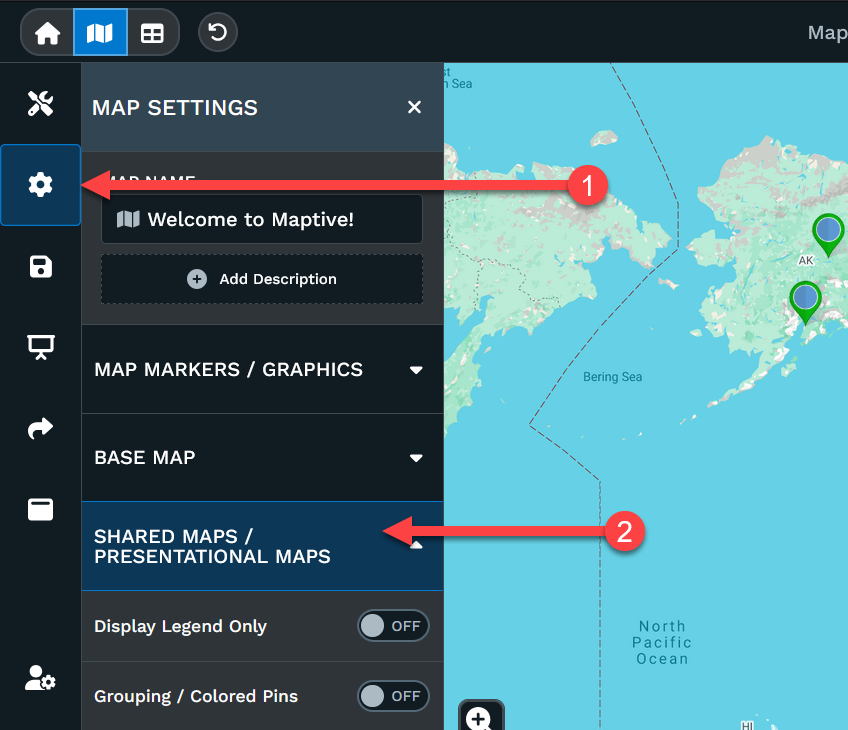
Step 1: Open the 'Map Settings' section by clicking on the gear icon on the left-hand side of your map.
Step 2: Look for the 'Shared Maps/Presentational Maps' menu and click it to open the options.
Step 3: Scroll through the entire drop-down menu for options to turn features on or off. Keep in mind, for a shared map less is more. You want to only include the tools your users will actually need, like filters.
The numbered arrows in the image correspond to the explanation below. Scroll further to match each number to its statement.

1. Turn this on to show Legend Only. The legend will be based on the Grouping Tool or the Geographic Boundary Tool.
2. Turn on to share the Grouping Tool. We normally suggest sharing the Filter tool over the Grouping as more people are familiar with filtering. Anything you are grouping in the grouping tool will follow you over to the filter tool.
3. Turn on to have the Legend replace Grouping.
4. Turn on to share the Filter Tool and any filters you've set up in your admin map for them to use.
5. Turning this on will open all the filter menus. If you're including a lot of filters leaving this off will allow people to click on the filter they want to use, instead of scrolling to search.
- Turn this on to include the Routing Tool for your shared users.
- Turn this on to include the Boundary Tool.
- For Radius/Drive Time Tool turn this one on.
- Turns on the Heat Map Tool.
- Turning this one will start the map with the tool box open. This allows users to see the tool(s) you included right away.
- Default Tool allows you to decide which tool shows first when the tool box starts open or which button is on top.
- Turns the Map Key on or off for the users access.
- Turn on to have the Map Key start on the map open.
- Choose which default Map Key Type starts upon opening.
- Turn on the Location Finder (we love this tool!)
- Starts the map with the Location Finder search box open.
- Turn on to Display Search Bar.
- Turn on to have the Search Bar always visible.
- Show Search Bar filter. This allow the end user to choose what the search searches, like data only or Google search only.
- You can choose the search bar filter default option.
- Allows the Satellite button to appear on the shared map.
- Allows the option for a user to find their own location. (please note: this only works if their browser's allow location services and/or they do not click block if their browser asks them for permission.)
- Has the Show My Location activate by default. Please keep in mind the above before turning this one on.
- Turns on the Distance Calculator.
- Switch on to include the Lasso Tool.
- Display Title/Description allows the users to see your map's name and any comments/notes you included. Turn it off to hide this information.
- Theme Style allows you to choose dark or light options for the program for your shared map.
- This shows street view in the marker popout if on. Turn off to hide this option.
- Marker Visibility Button allows the shared users to temporarily hide or show your markers. If you're hiding your markers, you may want to turn this off so the users cannot show your hidden markers.
- This allows the user to zoom in or out on the map. Turning it off prevents any zooming.
- Restrict zoom level is where you can choose how far out or in or both someone can zoom.
- Turning on Restrict Map Panning will prevent the user from panning or moving the map to see other areas.
- Here you can disable or enable any of your columns to hide on the shared map.
- This allows you to show/hide data on the marker.
- You can show/hide data from the export, if you're allowing exporting of your data.
- Authorize is where you can request exporting of the data by the shared maps. Once authorized it will show Activate. This is where you can set what tool(s) your shared user(s) can use to export the data.
- This is where you can find the iFrame to embed your map.